Showing posts with label Cricut. Show all posts

Wednesday, December 11, 2013

An oops kind of card.....

When I was working on my card for the upcoming challenge at
I was super pleased with my results.
Since this Saturday will be the Super Scraps challenge,
I just went to town with what was in my scrap pile.
And then...
**Insert the sound of screeching brakes.**
I remembered that we have a special sponsor this week.
Back to the drawing board I went.
(You'll need to come by on 14 Dec 2013 to see who the sponsor is.)

I so happy with the card I made for that challenge, albeit in error, that I couldn't possibly not share it with you.
So here it is:


Every bit of paper and ribbon that I used in this card was a bit of scrap.  Even the card base was left from another project.

I've seen this concept all over Pinterest and just love the elegant simplicity of the design.  When I noticed that I had a pretty large scrap of the Mirrored Reflective Cardstock from Paper Temptress, I knew that my ornament would have a shiny silver base.

The ornament shape was cut using my Cricut Expression and the Create a Critter 2 cartridge.  The sentiment is from a Recollections set.  The ink used was Colorbox Chianti.  All of the ribbons were tiny snippets from my stash.

This was such a simple card to make and I'm so in love with the results, I have no doubt I'll be making more of these!
Thanks for stopping by to take a look at my oops kind of card.
Enjoy the rest of your day!

This card can be found in the following challenges:


Saturday, November 16, 2013

Hiding in My Craft Room with Die Cuts

Happy Saturday everyone and welcome to the weekend!
It's time to announce a brand new challenge at
This week it's time to pull out your
Die Cuts.
These can be ones you've done with a manual die cutter, an electronic die cutter or ones that you've purchased....
just make sure your new project includes at least one
and you're good to go!

My project this week was one I used in a wedding for which I did the flowers and decorations.  A cousin's son and his beautiful lady love have finally become husband and wife.  I was thrilled to be asked to help with the festivities.  Being a hopeless romantic, a wedding is one of my favorite things on earth!!

The ceremony was held in the Marina overlooking Eagle Creek Reservoir here in Indianapolis.  The new Mr. & Mrs. are avid outdoors people and often go fishing in this area so the site was perfect!  Here's a picture of the lovely couple:

I truly hope they are this happy and in love on their 50th anniversary....
and every single year between now and then.

Photo credit: Christina Hayes

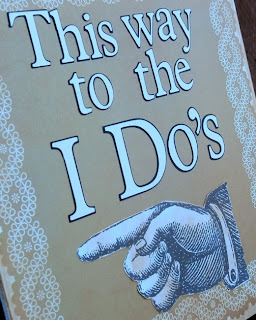
Since the Marina is in a deeply wooded area of the park, signs were needed to direct the guests to the walkway leading to the front door.  I had seen this idea on Pinterest (LOVE Pinterest!) and knew that I would use it someday.

The sign looks very small sitting on this easel.  It's a 12x12 sign....
and a really huge easel.


I cut the letters with my Cricut Expression and the Plantin Schoolbook cartridge.  That great steampunky looking finger was found over at
The Graphics Fairy.  If you're ever in need of some awesome free clip art, that should be your very first place to look!  There are over 4,000 vintage images along with fabulous project ideas and tutorial.
Great, great site!!

After I printed the finger, I fussy cut it.
I decided to use Tim Holtz Vintage Photo distress ink
to soften the white of the printer paper
and add to the vintage/rustic look of the sign.

In this photo, you can get a glimpse of the foam core board
I used to mount the paper on top of.  There were a couple of
very thin dowel rods attached to the back of the sign
that were stuck into the ground.

what you'll be doing with die cuts for the new challenge at
All of us on the Design Team really look forward to loads of new and varied projects.  It's always amazing to us how different all of our projects are and then we get the fun of seeing all of yours!
Hope you can join us.

Thanks so much for stopping by today!


Wednesday, November 6, 2013

Stamp 'n Doodle Remembrance card challenge

Hello and thanks for stopping by today.

It's Wednesday so that means it's time to begin a new challenge at
Stamp 'n Doodle.
Since November 11th is Remembrance Day in the UK and other Commonwealth countries, the theme for this week is
Remembrance Cards.
I'm American so my card is one that would be more appropriate for Veteran's Day which is also celebrated on November 11th.
Because I was thinking so much about the sacrifices made by members of our Armed Forces (both American and British)  I decided to make a card for Operation Write Home.


Ingredients used for this card were:

Stamp 'n Doodle image:  Calm Seas Lighthouse
Coloring medium:  ProMarkers and Kan'dee Chalk Set
Cardstock:  Papertrey Ink, Bazzill Basics
Pattern paper:  Template Dreams Sweet Bella kit
Stamps:  Stamper's Best, Cricut Posh Frames
Embossing folder:  Tim Holtz
Thanks for spending some time here today.
All of us on the Design Team at Stamp 'n Doodle
look forward to seeing everyone's new Remembrance cards.


Sunday, August 11, 2013

Yes, I know whales are mammals

I just know the child who receives this card will quickly point out that whales are not fish.  There are a lot of very intelligent children in my family!  Anyway, I just had to use the "birthday fishes" stamp from Papertrey Ink when I decided to do this card.  The face stamps are of course Peachy Keen.

The whale and starfish are both from the Cricut Create a Critter cartridge.  The papers are a mixture of things that were in my scrap box.  Don't you just love it when you can do entire cards without cutting into a fresh sheet of paper?  Kinda' feels like getting something for nothing....and I love that.

 I added Glossy Accents to the eyes of both critters and to the water coming out of the whale's blow hole.  To make it easier to do the Glossy Accents on the whale's spray and to be able to ink around his entire head, I first cut the water off.  Then just glued it on the mat before adding the whale.  A few little brads complete the card.


This card can be found in the following challenges:

Outlawz Challenges -- Sunday CAS Primary Colors
Peachy Keen Challenge Blog --Sketch
Fantabulous Cricut Cuts -- Make a splash
Addicted to Stamps and More -- Make your mark
Paula Holifield Crafts -- Summer sun
Hobby Cutz Challenges -- A card for a child


Thanks for stopping by my corner of the blogosphere!

Thursday, August 8, 2013

My Venture into Card Sketch Challenges

Today I'm trying my hand at Sketch Challenges.
This should be interesting because anyone who knows me will tell you that I'm not very good at following directions.
I much prefer to give directions!

Anywho.  Let's see what happens.  I think this is going to turn out to be really fun and should probably help me with some design issues I feel like are sometimes slowing me down.  And I think it's interesting to see how people interpret the sketches.

The first card is for CAS(E) this Sketch.  (Side note: this challenge is now closed.  I got this card submitted just under the wire.)


Next up is my card for Outlawz Wednesday Sketch Challenge.


This card is for the Super Sketchy Challenge at 365 Cards.


And my final card for the sketch challenges today is being submitted at Die Cuttin' Divas.
(How much do I love that name?  A LOT!)


This card can also be seen at 365 Cards in their earth tones challenge.


I had so much fun today working on these cards!  Sketches haven't seen the last of this girl.  If you have any questions about any of the cards or materials used, feel free to contact me.

As always thanks for the time you've spent here at
Queen Bee Paper Crafts!


Tuesday, August 6, 2013

Outlawz Challenges and their warm welcomes

In just the past week, I've started blogging and participating in card challenges at many different sites.  While I've been welcomed very kindly into all of the challenges, none has been as fantastic as the folks at Outlawz Challenges!  I've received so many visits and lovely comments.  Words can't express how much their encouragement has been truly appreciated.

I wasn't really planning on doing another post today or making a card specifically for a challenge.  However, I saw the color challenge at Outlawz (I love the combination!) and figured if they were going to be so kind to me then I'd do a quick card to spotlight them in a posting.

This is the color combo:


Gorgeous...right?
And they also add a twist to their Tuesday Color Challenges.
This week's twist is to add a tag to your card.

So here's my little card just for the Outlawz.


Thanks again to everyone at Outlawz!
Please be sure to leave a comment with your blog info
in it so I can come by and start following you.
(And a follow for me would be loverly.)

Look for this card at the Outlawz Color Challenge.


Okay, so I have to admit that I have a serious problem...I see a challenge and I HAVE to enter it!  It's a character flaw that has afflicted me my entire life.  Not so much a "gimme" attitude as a "get outta my way and let me do that" attitude.

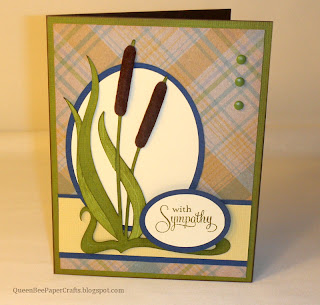
Anyway, I saw that Outlawz Thursday Twist challenge is Make your own Embellishment.  Well.  Give me my Cricut, the Art Nouveau cartridge, some flocking (from the dollar bin at Michael's) and a few pieces of paper from my scrap bin and just stand back.  This is card I made and I'm thrilled with those cattails!  I used a stylus along the back after the flocking was added to give it great dimension.  I'll definitely be doing this again.  It will look fantastic on a masculine birthday card.  Don't you think?


This card can be found in the following challengses:
 Outlawz Twisted Thursday -- Make your own embellishment
Digistamps4joy -- Make your own embellishment
DigiSketch Challenge -- Anything goes


Very "punny" little seahorse

For all of my fellow card makers out there who participate in weekly challenges:  How do you control the urge to search out every last one?  I've only been doing this for a week and already have started to look at my card making in a completely different way.  Suddenly, I'm thinking "Oh if I add some twine it works for that challenge" or "That color (sentiment, technique, etc) would fulfill the requirement for that site."  I think I may be hooked and, in all honesty, I am lovin' it!  Concentrating on the details like this is going to really step up my abilities.  Plus, looking at all of the incredible works showcased by the various challenge blogs is truly inspiring.

Yesterday, I went through a list of the challenge sites I've already joined with previous cards and tried to work with as many themes as possible.  There were 7 that really seemed to coordinate well so I used the requirements for each and this is the card that resulted.


My little seashore is from Cricut's Create a Critter and can be found on page 42.  He was cut at 3 inches and I removed the spot for his eye in Craft Room so another sweet little Peachy Keen stamp could be used.  White gel pen, Glossy Accents, and a bit of chalk complete his face.  I inked around all layers with Tim Holtz's Vintage Photo distress ink.
For the scallops on his head, wing-like dorsal fins, and little belly I used a stylus from McGill to do some curling to the back of the paper to add dimension.
(Love the end result of that simple step!)

I added a layer of Bazzill dark brown paper that was distressed using Tim Holtz's distressing tool between the card base and the top mat.  The card base and top mat are both Papertrey Ink paper.  The ovals were cut using my old school Creative Memories circle and oval cutting system.


I used a trio of tiny bubble stamps from My Cute Stamps "Be my Bridesmaid" set to randomly stamp some bubbles floating through the layers of blue papers.  Brilliance white ink was used.  After the ink dried, Glossy Accents was used to fill in the bubbles.
And I think the card wouldn't have nearly the impact without the Glossy Accents.

The sentiment is a combination of stamps from Papertrey Ink.  Life is a Journey is from their "Birds of a Feather" set.  And fin-tastic is from "Pond Life Sentiments" set.  I cut the Life is a Journey stamp into 2 pieces being very careful to not snip into any of the letters.  I love doing this with sentiment stamps....suddenly I can make my own sentiments.  The original phrase still fits back together perfectly.  Just like a little jigsaw puzzle.  

A couple of cooper colored eyelets and some hemp twine from my stash were added to the sides of the sentiment layer.  I think the "knot" in the twine gives a nautical feel to it.


As always, I appreciate you spending time at my blog and hope that you'll be so kind as to leave a comment.  I would also really love for you to begin following me!  Make sure you leave your blog info in the comment section so I can come by to take a peek at your work as well!

Here are the challenges you can find this card at:

Chocolate, Coffee, and Cards -- Color inspiration
Fantabulous Cricut Challenge -- Make a splash
Papertrey Ink Make it Monday -- Stamping random background
365 Cards -- All smiles
The Kraft Journal -- Layers
Kaboodle Doodles -- Anything with scallops
Addicted-to-Stamps  -- Wonderful with wings
2 Creative Chicks -- Anything for kids
Craft your Passion -- All at sea
Sentimental Sundays -- Child's play
Paula Holifield Crafts -- Summer sun


Sunday, August 4, 2013

Cricut Baby Steps + Peachy Keen = Too stinkin' cute!!

Already in this very young blog, I've stated just how much I love Peachy Keen face stamps.  And I'm gonna' say again...I love those cute little things!  Using those along with a white gel pen, Glossy Accents and a tiny bit of chalk makes me feel like I'm some sort of artist.

Then add in the power duo of Cricut Craft room and their Baby Steps cartridge.  And wow, baby!   (He he he, see what I did there?  Wow, baby....Get it? Baby Steps cartridge. Okay, so sometimes I amuse myself more than those around me.)  Anyway, the possibilities are truly endless.

Here's an example of some fun I had playing with these items.


In Craft Room, I welded together the cloud with the sky background and sized them to be the base of this shaped card at about 6 1/2 x 6 1/2.  I also scaled the cloud to be cut individually and the moon to fit on the base.  All of those items can be found on page 24 of the handbook.  I decided to use the baby from page 22 because I wanted her to be wide awake and ready for a Peachy Keen smile.  In order for the stamp to work properly, I hid all of the contours on the baby girl.  The balloons are from Create a Critter (but loads of cartridges have balloons.) 

I dry embossed the cloud using my Sizzix Textures and the Sizzix "Swirls" folder.  I then lightly inked the cloud with a Recollections light blue chalk ink.  The sky background is from SEI paper and was inked with Colorbox ink.  The stars are made with Liquid Pearls.  I did a little dollop in several spots and then went through each one with a bamboo skewer to make the points.  


Instead of using the flower that's included with the baby cut, I used a tiny flower punch from my stash and cut several layers from the scraps of the cut for her diaper, headband and balloons.  The edges were inked with a pink Recollections marker from the Michael's $ bin.  And it was completed with a purple brad for the eye of the flower.  We R Memory Keepers baker's twine was used for the balloon strings.


Along with the SEI paper, I also used Bazzill and Papertrey Ink papers.  And, SHOCKINGLY, I think I was able to complete this card without the use of a single Tim Holtz product.  I didn't think I could do that!


Thanks for stopping by and I hope that you have a wonderful week!

You can find me at the following challenges with this little sweetie:

Fantabulous Cricut -- Shaped card
Five Simple Things -- Inspire me Fridays
2 Creative Chicks -- Anything goes for kids
365 Cards -- Textured backgrounds
Hobby Cutz -- A card for a child

Friday, August 2, 2013

Gearing up for Halloween

I've decided to start listing some Halloween items over at my Etsy shop
and have started with a few cards.  Here are a couple of my favorites so far.


This cute little guy is trying to put on his best "mean" vampire look but I can't help but giggle.  His face was done with a stamp from the Peachy Keen Monster Mash Face Assortment.
I really like adore Peachy Keen face stamps.
I only have 3 sets in my collection....so far.
(She types as she fights the urge to go order more.)

The bat was cut at 1.25" using my Cricut and the Create a Critter 2 cartridge.  He's the icon found on page 59.  I cut his body out 3 times and, after trimming the ears off of the 2 bottom layers, glued all together with the wings staggered.  I did ink around all 3 layers with  Brilliance white before I attached them.  Cricut Craft Room was used to hide the features on his face.  As mentioned above, a Peachy Keen stamp added the sweet little face.  I colored his eyes and fangs with a white gel pen and covered the eyes with Glossy Accents.  The Glossy Accents just makes the eyes, in my opinion.

Papers from SEI, Bazzill, DCWV, and K&Company were inked with Momento Tuxedo black for the top layers and Brilliance white was used on the kraft card stock base layers.  I used a Martha Stewart punch to make a paper button using a scrap of the cute spider web patterned paper from K&Company and tied it on with orange, black and white bakers twine that I got at Glitter & Kitsch.

Hope you think he's as cute as I do!

This card will be joining the following challenges:

The Kraft Journal -- Cute critters
Peachy Keen -- Anything goes
Sparkles Forum Challenge -- Autumn colors
Addicted-to-Stamps Challenge -- Lots of layers
Kaboodle Doodles -- Anything with ink or paint
365 Cards -- Rounding the corners
Little Blue Button Stamps -- Use twine or rope


I used my Cricut again to make this evil beauty.  She is from the Art Nouveau cartridge and I love her.  She was cut at 3.5" and I decided not to use the back layer of the cut so that great harlequin patterned paper from K&Company could show through.  Glossy Accents was added to the "jewels" on her crown and just make them pop.  (Can ya tell I'm loving Glossy Accents?)

I used Tim Holtz Walnut Stain distress ink to lightly ink the edges of her face, hair and crown.  Bazzill papers were used for all layers of the witch.

I cut the sentiment frame with Elegant Edge cartridge.  The "wicked" stamp, black and white ribbon and little purple brads were all from my stash.

Please leave me some comments.  I love to hear how others have used the same cartridges.  Or if you know of a challenge that either of these would work for, please let me know!

As always thanks for spending some time at my blog.

Wednesday, July 31, 2013

Genealogy and cards....What a combination!

I had been thinking about doing this card for quite some time.
I just kept seeing all of these incredible cards, tags and altered art items using vintage photos and thought, "How cool would it be if I only had some images like that?"  Duh.  I'm an amateur genealogist....I have loads of those images!  So then when I saw a challenge for anything with wings I knew it was time.


I started with a photo of my Mother-in-law, Carol,
when she was about 10.  (Can absolutely hear her Mother telling her to stand up straight for the photo!)

Here are the steps I used to make this card:

  •  I printed the photo with my home laser jet printer onto light weight white card stock.
  • Next, I did a faux water color treatment of her collar, buttons, hat and socks using Tim Holtz Victorian Velvet distress ink before fussy cutting it.
  • For the base I used a dark coral toned card stock from my stash.  And all of the mats are dark gray Bazzill.  I think it's Blackbird but I'm not positive. 
  • Using Papertrey Ink Stampers Select White card stock, I stamped second generation stamps from the Harvest Berries and Guidelines stamp sets for the main patterned paper.    The greeting is also PTI.  It's from the Birds of a Feather set.  Yes, I have started to develop a serious love of all things Papertrey Ink!  The background paper was stamped with Tim Holtz Victorian Velvet and the sentiment was done with an unknown black stamp pad.  (It's kinda old so the color ends up being more of a dark gray and matches the mats better than any other black ink I currently have.)
  • I used a little scrap of DCWV paper for the horizontal piece of  patterned paper.
  • Inking around the edges of all lighter colored papers was done with more of the same distress ink.
  • To get the sentiment layer, I cut the main piece with an EK Success punch and layered in on Bazzill dark gray card stock. For the corners of the sentiment mat, I just used a good, old fashioned paper punch and notched out the corners to match the contour of the EK Success punch.
  • The wings were cut using my Cricut and the Art Nouveau cartridge at 3 1/2 inches.  They are the butterfly wings trimmed way from the body of the butterfly.  After I layered the base cut and the Layer 1 cut, I filled the spots in with Glossy Accents.
  • I added 3 tiny coral brads to the sentiment block and a bow of seam binding I had colored with none other than Tim Holtz Victorian Velvet.Hope you enjoy the card!


It was really a lot of fun to do.  And that's a good thing because my hubby has 3 sisters and now I need to make 2 more of the same card.  I'd never hear the end of it if I sent a card like this to just one of them.  I'd love to send one of this card to each of them. 


These are the challenges I'll be participating in with this card:


Please click here to post your comments about this post.
Related Posts Plugin for WordPress, Blogger...