Showing posts with label Cricut Flower Shoppe. Show all posts

Monday, October 7, 2013

Paper piecing and Saturated Canary

This week's challenge at Saturated Canary is to do some paper piecing.  I'd never done any before so I thought this would be a good excuse to give it a go.   I love Krista's images so much and I love trying my hand at any new (to me) technique I find so it was a match made in
challenge heaven.

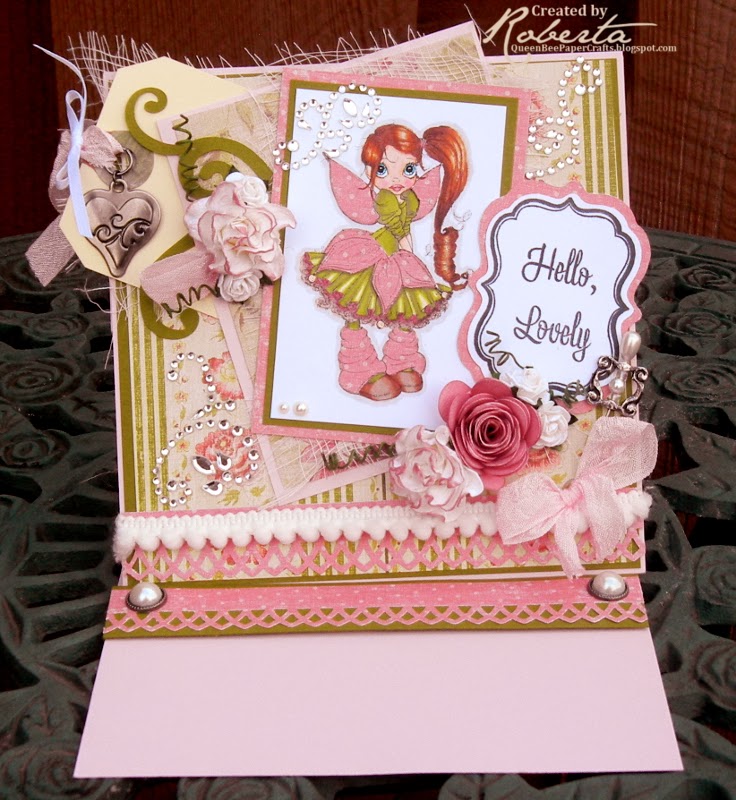
It was really easy and I think it makes a nice impact.  You can see in the photo below that I've pieced sweet little Whispy Fairie's wings, skirt overlay, and leggings.  I used the same DSP for some of the matting on my card to help make everything very cohesive.
 I colored her with my ProMarkers and continue to fall deeper in love with coloring digis.  It's been almost 2 months since I started and every time I finish an image I feel like a little girl waiting for someone to give me my gold star for coloring inside the lines.

Here are a couple more pictures of my card:


The items used on this card are:
DSP: K&Company 
Cardstock: Papertrey Ink
Pink rose: Handmade using Cricut Flower Shoppe
Mulberry paper flowers: Ebay
Heart charm: Michaels Dollar Bin
Bling swirls: Recollections
Tiny ball fringe: Joann (How cute is that?)
Seam binding: Etsy
Large pearl brads and beads for stick pin: my stash
Border punch: Martha Stewart
Sentiment: Papertrey Ink
Cheesecloth: My kitchen
The frame for the sentiment was stamped and cut using my brand new Cricut Posh Frames set.  I just got it a couple of days ago.  After I have a chance to play with it some more, I'll right a little review to let you know what I think of it.

Here is one final shot of my card:
As always, I appreciate your visit today and would love it if you could leave me a quick comment!

Friday, October 4, 2013

My Cricut Craft Room Blog Relaunch Hop

A few days ago, I shared the great news about
relaunching and hosting a blog hop.  Well, today's the day!

If you've come here through Leslie's blog, you're in the right place.  If you've just happened by, please stay and look around but be sure to start at the beginning of the hop when you're finished here.
You don't want to miss anything!

This is the complete list of participants:
1. Start at My Cricut Craft Room 
 2.  Vivi J
 3. Cindy M
 4.  Shawn Mosch 
 5.  Liliana Umpierre
 6.   Leslie Wrege McGrath
 7. You are here....thanks!
 8.   April Nourse
 9.  Brenda Knapik
 10.  Lourdes
 11.  Vicki Glenn
 12. Erica
 13. Connie Walsh
 14.  Tracey
 15.  Oh Kissa
 16.  Sandy 
 17. Kris Dietz
 18.  Mayra 
 19. Cheryl 
 20. Crafting Blog Events

For this hop, all participants were asked to complete 2 projects.  The only specific boundary was that it had to be made using either Cricut cartridges or SVG cutting files.  You are going to love the huge array of new creations that are shared today.  I've gotten to see little peeks of all of them and can't wait to see them in more detail!

I decided to do projects for Halloween and Christmas.
First I'll share the Halloween frames that I did:
I found the frames in a clearance bin at Michaels for $2 a piece.
Now I really wish I had grabbed a few more!
They look much better in person.
Here are some close ups of the individual frames:
 Cartridge used for spider web:  Mini Monsters
Cartridge used for witch:  Wrap it Up

I used black vinyl from CricketVinylSupplies.com on top of the glass.  Under the glass there are sheets from an old book that I wrinkled up and distressed using Tim Holtz inks.  After the inks were dry, it was really too dark and the vinyl didn't stand out enough.  A layer of cheese cloth over the book pages solved that issue.
**The little air bubbles that show on the witch's hat and skirt don't show nearly as much in person....my camera decided to really highlight those flaws.  Naturally.**

You can find these frames in the following places:


_________________________________________________


The Christmas project that I did is also a 2 parter.  I've made a wine bottle gift tag and a topper for a mason jar.  I thought this would make a great family gift....a bottle of vino for Mom and Dad along with a jar of candied pecans for the kids.  (As long as Mom and Dad don't eat the pecans after the little ones are tucked in for the night!)
Here's the gift set:
I had originally intended to really bling out the bottle tag but looking at the rustic simplicity of the mason jar, I really wanted to keep both items very basic.  So glad I did....I love this set!
Here are close ups of the individual pieces:
This canning jar can be found here:


Cartridges used:
Poinsettia:  Flower Shoppe
Lid top wrapper:  George & Basic Shapes
Bottle tag:  Wrap It Up
Gift tag on bottle tag:  Fabulous Finds

For the large bottle tag, I used one of the tag blackouts from Wrap It Up and stretched it in Cricut Craftroom.  The original hole was removed with the "remove contours" feature and I replaced it with a hole that measures about an 1.5".  The small tag on front of that is from Fabulous Finds.  It usually has a scalloped top but I trimmed that off by hand.

The poinsettias are so gorgeous!  It's such a shame my photos don't show them better.  I inked the edges of the petals (which aren't really petals...they're called bracts and are modified leaves)  with Tim Holtz Vintage Photo.  The yellow center (that's the flower of a poinsettia) was first inked with Tim's Forest Moss and then Fired Brick.  All of the bracts and the leaves were formed by using a couple of different sizes of styluses.  I've used this same poinsettia in a smaller version on one of the cards you can find here.  And I know these little beauties will be showing up on some Christmas packages this year.  Won't they make great gift toppers?

This gift set is being shared here:
_________________________________________________

Well, there ya' go.  My 2 (or is that 4?) projects for the
blog relaunch hop.  I hope you've enjoyed them.  Now, please continue on to the next project.  You'll be able to find it over at April's blog.  

Thanks for joining me today.  Leave a comment if you have a second or two....I'd love to hear from you!


Wednesday, September 18, 2013

My first telescoping card

I think I may have just found a new contender for my favorite card style although I'm not sure anything can replace easel cards.  Today I tried my hand at a telescope card and it was so easy!  I love that it has so much impact and is really different from most cards.

It did, of course, take me much longer than it probably should have.  I'm just so darned indecisive on how to embellish cards.  There are so many things yet to learn about color, balance, scale, etc.  I'm getting there....I think.  My comfort level is increasing with each card I make so that's a positive sign.  And, besides, I'm having a blast.  What else matters?

The image used on this card is from Mo Manning.  Love, love, love her work!  It always puts a smile on my face to just look at one of her images.  They're really fun to color too.  There's enough detail to make it look great without so much that it becomes fussy.  There's a fine line between the two and Ms Manning seems to know just where it is.

Recipe for this card is as follows:
Papers:  Papertrey Ink, Bazzill, K&Company
Cricut cartridges: Elegant Edges, Flower Shoppe
Markers: ProMarkers
Stamps: Little Yellow Bicycle, Papertrey Ink, Inkadinka Doo,
Clear Dollar Stamps
Flowers: Wild Orchid Crafts and handmade for the light peach one
Brads, bling and ribbon: From my stash

Here's the card:


I do wish I had set the brad a little higher on the bottom panel.  I'll know better next time.  But don't you think it looks like there's static electricity in the little guy's hair as if the middle panel were a balloon?  I like the way it looks.  It's what I call a happy accident.

You can find this card in the following challenges:

Bronte & Bella's Blog -- Say it with flowers

Saturday, September 14, 2013

Ugly Christmas sweaters and Saturated Canary

Saturated Canary has quickly become one of my favorite digital stamp companies.  Their images are so fun and sweet!  I only have a couple of their digis so far but I've had a blast using both of them.  You can see my first card using "Boobie Love" in this post.

I knew the card I was going do for this post was going to be the one called "[Ugly] Christmas Sweater."  The sweet little girl and one of the fabulous sentiments that's included just crack me up.
Here's a quick look:


The look on her face, the way her toes are pointed inward, and her little shrugged shoulders make for a complete look of embarrassment.   Don't you agree?  The artist for Saturated Canary is Krista Smith.  She is a lovely lady and I'm both inspired by and envious of her talent.  Mostly, though, I'm just thankful that she's decided to make her artwork available.

You know I can't possibly post an entry in this blog without rambling on including some sort of story.  Here's the one for this card:
The entire time I was coloring the image, I was remembering a time when hubby and our 2 younger boys were going to what we all thought was a costume party at one of my cousins' houses.  (I had to work that evening and couldn't attend.)  Well, as you may have guessed, it was not a costume party just a good old fashioned bonfire.  The 2 boys were just wearing black capes over regular street clothes so they were able to ditch the costumes easily.  Hubby, however, was in a full Superman suit.  Not Clark Kent....Superman!  Being the great sport he is, he just walked around the corner and owned it!  Everything was going just fine until the son of another of my cousins' looked at him and said, "You know Spider-Man is better."  That little boy's name is Kaleb and he was probably about 5 or 6 at the time.  Cuter than you can imagine and way too smart for his parents' own good!  (Kaleb's no longer a little boy but instead a handsome young man....wonder if he still favors Spider-Man?)

So, now onto the actual details of the card.  I'll just list the items used and then include a few more pics.

*Coloring: ProMarkers
*Papers: Bazzill, Recollections and DCWV
*Lace:  Joann
*Charm: Joann jewelry dept.  Sorry don't have the maker's name.
*Cherub:  My Mom's stash (Uses them on her incredible stained glass creations)
*Cricut cartridges used: Elegant Edges, Flower Shoppe, and Home Decor
*Beads: Dollar Tree and my stash
*Ribbon: my stash
*Cheese cloth: from my kitchen.  I did dye it with Tim Holtz Vintage Photo for that great color.

If you have any questions about any of the finer details, please feel free to either email me or leave it in the comment section.


Thursday, September 12, 2013

Bright and cheery Halloween

I'm not sure what possessed me to make a Halloween card in bright pink, aqua, and lime green but I like it!  I'm still pretty limited on the colors of ProMarkers that I have so that does eliminate some choices.  (Should have had more markers by now.....long, ugly story that ends with the very first negative feedback I've ever left on Ebay.)  Letraset is all the way on the opposite side of the pond and they're who I should have ordered from for this round of colors.  Lesson learned.

I knew that I wanted to use this adorable image by Lacy Sunshine.  She's called Witchy Susie and you can find her in the $1 retiring digis section of the shop.  I love $1 deals.  When I sat down to decide what colors to use, the bright ones just jumped out at me.

Here's little Susie in all her glory:


I really wanted to emboss the aqua mat but I only have the capability to emboss A2 size cards and this is 5.5"x5.5" so I had to improvise.  Instead, I just used my ScorPal and scored every half inch both vertically and horizontally.  Problem solved.

These are the items I used to complete the card:
**Cardstock: Recollections for everything but the base and that is Papertrey Ink
**Patterned paper:  Studio G from the Michaels Dollar Bin!  It comes in 6x6 packs of 15 sheets....for a buck.  Really cute patterns all in the same color family.  I now have the pink, blue, yellow, and green.  If I find more, I'll buy more.  Great value, I think.
**Stamps: "Happy" is Papertrey Ink and "Halloween" is from a dollar stamp, maker unknown.  (Did mention I love $1 deals?)
**Aqua Mulberry paper roses:  Ebay.  A good Ebay seller.  Floraworld is their name and they shipped super fast plus they added in a little pack of leaves as a free gift.
I'll be buying from them again!
**Fringe ribbon: Joann
**Beads: Mostly from the Dollar Tree....do ya' see a pattern in my shopping habits?
**Bead spray:  Michaels in the bridal section
**Hand charm:  Michaels in the jewelry supplies section
**Clasp the beads are attached to: Tim Holtz
**Rhinestones:  Recollections and, of course,
Michaels Dollar Bin...lol
**The pink rose I made using my Cricut and the Flower Shoppe cartridge.

You can find Susie in the following challenges:

Wednesday, August 21, 2013

A day late for a couple of things.

So far this morning I've:

#1. Found out the color challenge I had made this card for is now closed.  The color combo isn't one I would typically have chosen for myself so it was a good one to make me go outside of my comfort zone a bit.  I just wish I had paid closer attention to the closing date.  While I would like to say that it was a lesson learned, it probably wasn't and I'll do the same thing again.  But if the resulting card(s) is/are as satisfying as this one I'll be perfectly okay with repeating this particular history.  So, overall, no biggie.

#2. Realized I forgot to call my Father on his birthday yesterday.  In my own defense, the confusion stems from the fact that he celebrated his "24th" birthday yesterday and I had the number 24 stuck in my brain this year.  I honestly thought I had until August 24th to call and wish him a happy day.  So, instead, I'll be calling him later and wishing him a belated happy day.
(It was his 45th annual "24th" birthday for the record.)

So, can I just go back to bed and wake up yesterday morning and try this all over again?  No?  Alright then here's the card I made using some really bright colors.  They are beautiful together just not my usual choice.  I also used a lot more embellishments than I have in the past.  I'm really drawn to the cards that I see that are blinged out to the hilt....just inexperienced in the making of them. 


The hummingbird cut is one from the Cricut Art Nouveau cartridge that I love.  It has an elegant look to it and the layering is easy as can be.
Double love.
This cart is one that I don't see mentioned in many places and that's really a shame.  There are so many fantastic cuts here!  Do keep in mind that many of the cuts are super intricate and require a large size to be able to work with them.  Even with that limitation, I think it's one of my stand out carts and worth every penny I spent on it.
(Which was naturally a sale price or Ebay deal....
never full retail for this ol' girl.) 


Since I'm not one to ever leave well enough alone, I decided to make my first twisted easel card using colors I'm not comfortable with and a style I'm inexperienced in.  Sure!  Why not?  I'm so happy I did!  Talk about easy peasy for huge impact.  Again, YouTube provided a couple of videos that walked me through the process and now I have a new fancy fold in my card making arsenal.  My hubby loves cards that have any sort of action, pop up, etc so this one is right up his alley.  I guess it's the little boy in him that these appeal to so much....I don't question it.  I've decided to find it charming.


You can find this card at the following challenges:

Bitten by the Bug 2 -- Summer heat is for the birds
Love to Scrap -- Bingo using flowers, ribbon & sentiment
Mojo Monday -- Sketch
Avenue 613 -- Anything goes with a twist: stitching
Hiding in my Craft Room -- Stitching
Craft your Passion -- Summer flowers
Crafty Sentiments -- Colorful
Loves Rubberstamps -- Round or square cards
Papertake Weekly Challenge -- Flower power
The Paper Girls -- Photo inspiration


Recipe for this card:
Paper: Bazzill, Papertrey Ink, and SEI
Lace, seam binding, and ribbons:  Martha Stewart and my stash
Metal brackets: Making Memories
Rhinestones: Michael's dollar bin
Cricut Cartridges: Elegant Edges, Flower Shoppe, and Art Nouveau
Sentiment stamps: Papertrey Ink


My day has gotten better since I started typing this post.  My hubby had already planned on taking today off (much needed and well deserved) and he took me out for some brunch.  I hope you enjoy your day and appreciate that you took the time to visit.


Friday, August 16, 2013

Hello, Lovely

First things first.  I'm not sure if this is a question or a rant.
The Disney Classics cartridge from Cricut.
Ugh.
I've tried several of the images and wind up getting really frustrated with them, my Expression, myself, and everything around me....Kind of the butterfly effect of crafting irritation.  Some of the pieces are so small insanely microscopic!  I realize that I just need to do larger cuts to increase the size of the smallest components.  But how flippin' big do you need to cut them so you can even see them?  The images are super cute; it just drives me nuts that I'm not able to use them.  Does anyone have any suggestions, a list of minimum sizes recommended, hints, clues?  I'll be happy to accept any help offered!

Whew.
I feel so much better.
Now, with all of that being said, I'd like to talk about a card I made using you know what.  Yep, I took a chance on the Disney Classics cart again today.  I decided to keep it as simple as possible so I used the adorable Flower from "Bambi."
Only Walt could have made a skunk so stinkin' cute.
(Couldn't resist.)

I removed the contours from the white layer in Craft Room because I have a problem making my layers match perfectly and those little lines only make that more obvious.  That issue is all me.  It has nothing to do with which cart I'm using.  I'm just messy.

The roses on the card were made using Flower Shoppe and their edges were inked with Distress Ink.  That great sentiment is from Papertrey Ink.  The pearls and ribbons were from my stash.


You can find this card at the following challenges:

Really Reasonable Ribbons -- Pink & brown ribbons
Outlawz -- Wednesday sketch
Exploring Cricut -- Disney dreaming
Jellypark Challenges -- Cuddly wuddly
Inspire Me Fridays -- Anything goes #116
Digi Sketch Challenge -- Make your own flowers
Hiding in My Craft Room -- Thread/stitching
Craftin' Boutique Challenges -- Anything goes


Sorry for the vent.  But, my husband will be happy I have this outlet to get that off of my chest before he gets home.

Hope you have a fantastic weekend and, as always, would love to hear your comments.

Saturday, August 10, 2013

A couple more Sketch Challenge cards

A few days ago, I decided to start doing cards for challenges that require the use of a sketch.  It was so much fun, I did a couple more.  Have to say I'm pretty darned proud of the 2 resulting cards.


I really like love this card!
The Glossy Accents on the floral pattern just pops in person.
(I wish my photo taking was better....working on it.)
The vase was cut at 3 1/2" using the Cricut Art Nouveau cartridge.  That cart is quickly becoming one of my go-to's.  So many great images!  

This card can be found at the following challenges:

The House that Stamps Built -- Sketch challenge A713
Party Time Tuesdays -- Friendship cards
Word Art Wednesday -- Anything goes
365 Cards -- I've got the blues
Outlawz Saturday Paper a la Mode -- Best friends


Yes, that is a Christmas card.  In August.  I recently saw a video on YouTube that showed how to make the poinsettia using the Flower Shoppe cartridge and had to give it a try.  Making it was super easy and the finished flower is really gorgeous.

This card can be found at the following challenges:


Christmas Cards All Year 'Round -- August challenge
Craftin' Boutique -- Christmas
365 Cards -- Overlapping elements
ABC Christmas Challenge -- P is for.....poinsettia
Crafty Hazelnut's Christmas Challenge -- Anything goes


If you have any questions about either of the cards or any products that I used, please send me an email.
Related Posts Plugin for WordPress, Blogger...