Showing posts with label Halloween. Show all posts

Tuesday, September 17, 2013

Mini Boo Banner

Today I want to quickly share with you a little banner I've made for Halloween.  It's not a huge one; in fact, it only measures about 18" across as it's photographed.  The letters could be separated more but I think it would look a bit awkward.

The base circles that the rosettes and letters sit upon were cut at 4.5" using Cricut Elegant Edges.  I decided to offset the shadow layer rather than lining up the scallops.....just to be different.  I like the effect and will probably use it again for more projects.  The letters were cut at 2.25" using Cricut Old West.  I really like that cartridge although I've not used it as often as I should.  

For loads of dimension, I added rosettes to each of the circles.  I scored at half an inch for the folds in the rosettes so they would be super tall.  Pop dots were used to mount the letters onto their shadows.  Tim Holtz distress inks in Walnut Stain and Spiced Marmalade were used.

Originally I had intended to list this for sale in my Etsy shop....not sure that will happen though.  It's just so cute I think it needs to hang from my mantel.  Guess I'll have to do another one to sell. 

Thanks for stopping by and I hope you're having a great day!


The 2nd photo is to show the dimension the rosettes added not just how many pop dots I like to use.
So just pretend you don't see all of those because I do use a bunch.

You can find this banner in the following challenges:

Kaboodle Doodles -- Anything but a square
Fantabulous Cricut Challenges -- ABC's 123's
Bitten by the Bug2 -- Anything fall
Craftin' Desert Divas -- Autumn/fall
Crafty Sentiments Designs -- Autumn/fall colors
Craft Your Passion -- Autumn colors
ABC Challenges -- V is for very cute
Country View Crafts -- Layers

Tuesday, August 6, 2013

Outlawz Challenges and their warm welcomes

In just the past week, I've started blogging and participating in card challenges at many different sites.  While I've been welcomed very kindly into all of the challenges, none has been as fantastic as the folks at Outlawz Challenges!  I've received so many visits and lovely comments.  Words can't express how much their encouragement has been truly appreciated.

I wasn't really planning on doing another post today or making a card specifically for a challenge.  However, I saw the color challenge at Outlawz (I love the combination!) and figured if they were going to be so kind to me then I'd do a quick card to spotlight them in a posting.

This is the color combo:


Gorgeous...right?
And they also add a twist to their Tuesday Color Challenges.
This week's twist is to add a tag to your card.

So here's my little card just for the Outlawz.


Thanks again to everyone at Outlawz!
Please be sure to leave a comment with your blog info
in it so I can come by and start following you.
(And a follow for me would be loverly.)

Look for this card at the Outlawz Color Challenge.


Okay, so I have to admit that I have a serious problem...I see a challenge and I HAVE to enter it!  It's a character flaw that has afflicted me my entire life.  Not so much a "gimme" attitude as a "get outta my way and let me do that" attitude.

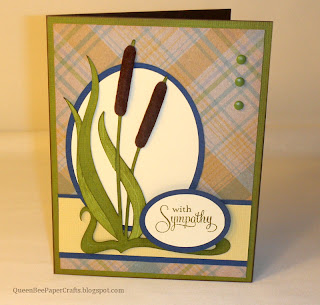
Anyway, I saw that Outlawz Thursday Twist challenge is Make your own Embellishment.  Well.  Give me my Cricut, the Art Nouveau cartridge, some flocking (from the dollar bin at Michael's) and a few pieces of paper from my scrap bin and just stand back.  This is card I made and I'm thrilled with those cattails!  I used a stylus along the back after the flocking was added to give it great dimension.  I'll definitely be doing this again.  It will look fantastic on a masculine birthday card.  Don't you think?


This card can be found in the following challengses:
 Outlawz Twisted Thursday -- Make your own embellishment
Digistamps4joy -- Make your own embellishment
DigiSketch Challenge -- Anything goes


Friday, August 2, 2013

Gearing up for Halloween

I've decided to start listing some Halloween items over at my Etsy shop
and have started with a few cards.  Here are a couple of my favorites so far.


This cute little guy is trying to put on his best "mean" vampire look but I can't help but giggle.  His face was done with a stamp from the Peachy Keen Monster Mash Face Assortment.
I really like adore Peachy Keen face stamps.
I only have 3 sets in my collection....so far.
(She types as she fights the urge to go order more.)

The bat was cut at 1.25" using my Cricut and the Create a Critter 2 cartridge.  He's the icon found on page 59.  I cut his body out 3 times and, after trimming the ears off of the 2 bottom layers, glued all together with the wings staggered.  I did ink around all 3 layers with  Brilliance white before I attached them.  Cricut Craft Room was used to hide the features on his face.  As mentioned above, a Peachy Keen stamp added the sweet little face.  I colored his eyes and fangs with a white gel pen and covered the eyes with Glossy Accents.  The Glossy Accents just makes the eyes, in my opinion.

Papers from SEI, Bazzill, DCWV, and K&Company were inked with Momento Tuxedo black for the top layers and Brilliance white was used on the kraft card stock base layers.  I used a Martha Stewart punch to make a paper button using a scrap of the cute spider web patterned paper from K&Company and tied it on with orange, black and white bakers twine that I got at Glitter & Kitsch.

Hope you think he's as cute as I do!

This card will be joining the following challenges:

The Kraft Journal -- Cute critters
Peachy Keen -- Anything goes
Sparkles Forum Challenge -- Autumn colors
Addicted-to-Stamps Challenge -- Lots of layers
Kaboodle Doodles -- Anything with ink or paint
365 Cards -- Rounding the corners
Little Blue Button Stamps -- Use twine or rope


I used my Cricut again to make this evil beauty.  She is from the Art Nouveau cartridge and I love her.  She was cut at 3.5" and I decided not to use the back layer of the cut so that great harlequin patterned paper from K&Company could show through.  Glossy Accents was added to the "jewels" on her crown and just make them pop.  (Can ya tell I'm loving Glossy Accents?)

I used Tim Holtz Walnut Stain distress ink to lightly ink the edges of her face, hair and crown.  Bazzill papers were used for all layers of the witch.

I cut the sentiment frame with Elegant Edge cartridge.  The "wicked" stamp, black and white ribbon and little purple brads were all from my stash.

Please leave me some comments.  I love to hear how others have used the same cartridges.  Or if you know of a challenge that either of these would work for, please let me know!

As always thanks for spending some time at my blog.
Related Posts Plugin for WordPress, Blogger...