Showing posts with label Tim Holtz. Show all posts

Friday, January 3, 2014

Creative Fingers & Sassy Studio Designs


Welcome to a brand new challenge at

We have an Anything Goes challenge this week.
Our fabulous sponsor is

All of the Design Team was lucky enough to be able to choose a
fun and fantastic images from Sassy Studio.
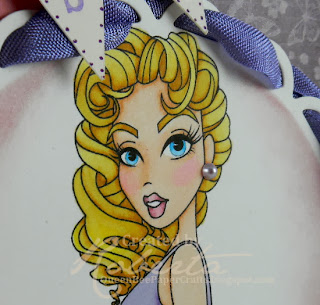
I decided on "The Greatest Gift."


Santa (aka: my hubby) was so sweet this Christmas and brought me a Big Shot.  Yay!!  I used the largest of the Spellbinders Lacey Circles to cut the image.  While the die was still in place, I inked around the image with Tim Holtz Victorian Velvet Distress Ink.  


Lavender seam binding was woven through the scallops.  I added a small Prima mulberry flower and a resin flower over the "tails" of the seam binding to complete the embellishing of the image layer.


The banner was cut using my Cricut Expression and the Create a Critter 2 cartridge.  I merged 2 banners in Cricut Craft Room to make it long enough for all of the letters and the tiny hearts.


You can find this card in the following challenges:
Make sure you head over to
and check out all of the inspiration pieces
from the rest of the Design Team.
We all hope you're able to join the fun of this new challenge!


Saturday, December 28, 2013

Hiding in My Craft Room -- Anything BUT a holiday


Welcome to the final challenge of 2013 for
Hiding in My Craft Room

This week I'm really happy to tell you that the theme is:
Anything BUT a holiday!!

I think I may have skipped with joy just a little bit as I was putting away my Christmas crafting supplies yesterday.  They will be great to see again next year but for now:  enough already!

My card this week is crazy with color.  I started with Lacy Sunshine's Eleanor Painting Ladybugs image.  Next, the papers were chosen.  Since I knew the colors needed to be really bright and fun for this card, I went to my 6x6 pad of Glitz Finnley.  It's full of great patterns and eye popping colors.


The sentiment stamp from Inkadinkado's Friendly Advice was perfect for the direction I wanted to take this card.


I didn't have any beads that were the right colors for this card but still really wanted to use one of these adorable little bottles.  What to do?  Use some bright pink embossing powder, of course.  It's actually Ruby Red from Stampendous.  The color deepens a lot after the powder has been heated.

Here are a few more shots of some of the other embellishments:


I had so much fun working with this image....I always do when I color Eleanor!  She reminds me of my future daughter-in-law with that sweet little face and great big glasses.


I added some super small dots of Liquid Pearls in Petal Pink around the image.  First I stamped hearts and flourishes from My Cute Stamps' Lots of Love in Memento Desert Sand.  The little butterflies are from Tim Holtz's Flights of Fancy set.  They were stamped using Victorian Velvet.  I stamped it off once on scrap paper and then onto to the image sheet.  This helped keep the color very soft.  I inked around the image with Victorian Velvet also.  The corners for the image and the mats beneath it were all shaped using We R Memory Keepers' Deco Corner Chomper.


So there is my card for this week's new challenge at
I hope you have a chance to go take a look at the other items done by the rest of the HIMCR Design Team.  There's always a huge variety of really great inspiration pieces!

Of course, we would all love for you to join in the fun of the new challenge.  Good luck to all who enter.

You can find this card in the following challenges:

Thanks for stopping by today.
Have a great last few days of 2013!!


Saturday, December 7, 2013

Hiding in My Craft Room #127

Hello and welcome to a brand new challenge at
We have a great theme for you this week and one that's very timely....
Holiday Colors.

Here's a quick peek of my card:


Our lucky winner will be receiving this package of goodies.

I had so much fun making this card!  The primary reason for that fun was the incredible images I used.  They are from Mo Manning and the set is called Tea for Three.  It's a great set that includes 3 sweet little girls, a tea set, cupcakes and ice cream.

For my card today, I just used 2 of the little girls.  They made me think of my niece's daughters who are just so darned cute.  A few weeks ago my niece's hubby mentioned on Facebook how much fun he had during vacation being able to play tea party with his girls.  What a precious memory they were able to make!  This card was made with them in mind.

I made this into a teapot shaped easel card.
T
he teapot was cut with my Cricut Expression
and the Wall Decor and More cartridge. I altered the size and shape in Cricut Craft Room.


You can see in this photo that there were 3 teapots
cut.  I glued the first 2 together along just the top edges.
The final one was glued to the bottom edge of the one
below it.  The concept is exactly the same as a traditional
easel card....just in a different shape.

The pennants were cut using the Party Picks
and Pennants cart in Craft Room.  I merged 2 images
together to make it long enough for the word "Imagine."
Is there anything more magical about childhood than
the freedom of imagination?

All of the edges have been inked with
Tim Holtz Distress Ink in Tea Dye.
It only seemed appropriate.

Other items used to make this card were:
Coloring Medium:  ProMarkers
Cardstock:  Papertrey Ink
Lace: Martha Stewart (It was dyed with Tea Dye ink)
Poinsettia and rhinestone stickers:  Michaels $ bin
Mulberry paper flowers:  Wild Orchid Crafts
Beads:  The Bead Gallery
Ribbon:  My stash
Angel charm:  My Mom's stash (Thanks!)

You can find this card in the following challenges:


All of us on the Hiding in My Craft Room Design Team
are looking forward to seeing all of the new projects
for this week's challenge.
Good luck to all that enter!!

Thanks so much for stopping by today.
I always appreciate the time you spend here
and love to read your comments.


Tuesday, December 3, 2013

TTCRD -- Team B

I hope everyone has survived Black Friday and Cyber Monday!
Things just start rolling past so quickly this time of year.  Don't they?
Let's all try to take a deep breath every now and then to remember what is truly important.  Things that could never be purchased at any sale.

Working on my card for the new challenge at
reminded me of that!
As always, our challenge is Anything Goes.
This week it is Team B who will be providing some inspiration pieces.
Here is my card:

Because the image and sentiment felt so powerful
to me, I didn't add any embellishments.
They just seemed unnecessary.


This incredible image is called The King.
You can find this along with Krista's
other artwork at Saturated Canary.
I paired it with a sentiment from Inkadinkado's
O Holy Night stamp set.

All layers were distressed.
The upper right corner of the wood grain
pattern paper was curled around
a bamboo skewer to add just a tiny bit
of dimension to my card.


Items used to make this card were:
Cardstock:  Bazzill Basics
Coloring Medium:  ProMarkers

Thank you so much for taking time to check out my card today.
I hope you have a chance to join us at
All of us on the Design Team love looking at your new creations!

You can find this card in the following challenges:

Monday, November 18, 2013

Love to Scrap Guest Designer

This is my second and final challenge as Guest Designer for
I would like to again thank them for the honor
of being able to join them!

The theme this time is:
Boyz Rule.
(As the Mom of 3 sons, I have to say that I completely agree!!)
Your card/project needs to be masculine....
either for a big guy or a little guy.

Sponsoring this fortnightly challenge is:
One lucky winner will be able to choose 5 digis.
If you're an animal lover, this is the shop for you!
Everything from dogs & cats to hippos & elephants are available.
Lots of other cute images too, of course.

Here is my card for the challenge:

I kept the colors very earthy
and the embellishments to a minimum.
Even with the very cutesie image,
the card maintains a masculinity to it.

I've used Mo Manning's Sticky which was colored
using ProMarkers.

That adorable "Nice List" is from
the Recollections Peppermint Twist stack.

I distressed each layer and then inked them
with Tim Holtz Forest Moss Distress Ink.


The ingredients used in this card were:
Cardstock:  Bazzill Basics
DSP:  Recollections
Coloring medium:  ProMarkers
Brads: Recollections
Ribbon: My stash

The talented Design Team at Love to Scrap! is looking forward to seeing lots of  great, new projects for their Boyz Rule challenge.
Good luck to all who enter!

As always, I appreciate the time you spend here
in my little corner of the blogosphere.  

Saturday, November 16, 2013

Hiding in My Craft Room with Die Cuts

Happy Saturday everyone and welcome to the weekend!
It's time to announce a brand new challenge at
This week it's time to pull out your
Die Cuts.
These can be ones you've done with a manual die cutter, an electronic die cutter or ones that you've purchased....
just make sure your new project includes at least one
and you're good to go!

My project this week was one I used in a wedding for which I did the flowers and decorations.  A cousin's son and his beautiful lady love have finally become husband and wife.  I was thrilled to be asked to help with the festivities.  Being a hopeless romantic, a wedding is one of my favorite things on earth!!

The ceremony was held in the Marina overlooking Eagle Creek Reservoir here in Indianapolis.  The new Mr. & Mrs. are avid outdoors people and often go fishing in this area so the site was perfect!  Here's a picture of the lovely couple:

I truly hope they are this happy and in love on their 50th anniversary....
and every single year between now and then.

Photo credit: Christina Hayes

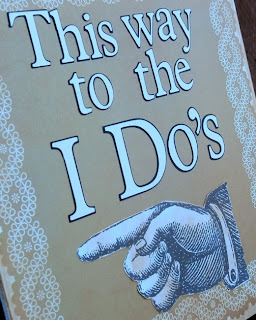
Since the Marina is in a deeply wooded area of the park, signs were needed to direct the guests to the walkway leading to the front door.  I had seen this idea on Pinterest (LOVE Pinterest!) and knew that I would use it someday.

The sign looks very small sitting on this easel.  It's a 12x12 sign....
and a really huge easel.


I cut the letters with my Cricut Expression and the Plantin Schoolbook cartridge.  That great steampunky looking finger was found over at
The Graphics Fairy.  If you're ever in need of some awesome free clip art, that should be your very first place to look!  There are over 4,000 vintage images along with fabulous project ideas and tutorial.
Great, great site!!

After I printed the finger, I fussy cut it.
I decided to use Tim Holtz Vintage Photo distress ink
to soften the white of the printer paper
and add to the vintage/rustic look of the sign.

In this photo, you can get a glimpse of the foam core board
I used to mount the paper on top of.  There were a couple of
very thin dowel rods attached to the back of the sign
that were stuck into the ground.

what you'll be doing with die cuts for the new challenge at
All of us on the Design Team really look forward to loads of new and varied projects.  It's always amazing to us how different all of our projects are and then we get the fun of seeing all of yours!
Hope you can join us.

Thanks so much for stopping by today!


Wednesday, November 6, 2013

Stamp 'n Doodle Remembrance card challenge

Hello and thanks for stopping by today.

It's Wednesday so that means it's time to begin a new challenge at
Stamp 'n Doodle.
Since November 11th is Remembrance Day in the UK and other Commonwealth countries, the theme for this week is
Remembrance Cards.
I'm American so my card is one that would be more appropriate for Veteran's Day which is also celebrated on November 11th.
Because I was thinking so much about the sacrifices made by members of our Armed Forces (both American and British)  I decided to make a card for Operation Write Home.


Ingredients used for this card were:

Stamp 'n Doodle image:  Calm Seas Lighthouse
Coloring medium:  ProMarkers and Kan'dee Chalk Set
Cardstock:  Papertrey Ink, Bazzill Basics
Pattern paper:  Template Dreams Sweet Bella kit
Stamps:  Stamper's Best, Cricut Posh Frames
Embossing folder:  Tim Holtz
Thanks for spending some time here today.
All of us on the Design Team at Stamp 'n Doodle
look forward to seeing everyone's new Remembrance cards.


Related Posts Plugin for WordPress, Blogger...