Showing posts with label Sizzix. Show all posts

Tuesday, October 29, 2013

Just Inspirational Challenges & Delicious Doodles

All of us on Team B at
would like to thank everyone that joined us for our Brads challenge.  What a simple embellishment and yet so many great ways to use them!
We really have some talented folks entering our challenges...hope to see you all back this week and lots of new faces, too.

For this week, our theme is
Kraft paper

Our fabulous sponsor is

The lucky winner will be able to select some of the coolest digis available!  The variety at Delicious Doodles is incredible.  If you're looking for something a bit edgier, you'll love their images.  There are also some very feminine ones.  I think everyone will be able to find something that suits their fancy.

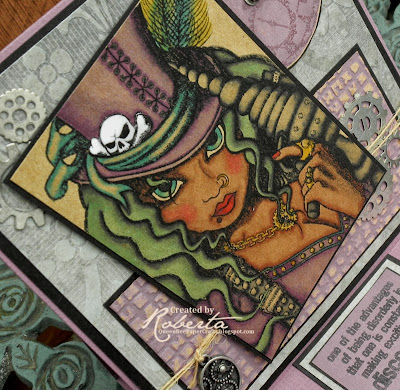
This week, I've really stepped out of my usual comfort zone and attempted to do something a bit Steampunk.  I'm not real familiar with the style so if I failed miserably, please be kind with your remarks!


This hot little Mama's name is Steampunk Sally and she looks like she has a "Take no prisoners" kind of attitude.  My kinda' chick!


Since our theme is Kraft, I printed and colored the image on Kraft from Paper Temptress.  It is the Colored Brown Bag Kraft that I've recently become addicted to using for coloring.

The paper used for the clock and the dry embossed mat at the bottom of the card are also from Paper Temptress.  It is the Eggplant Brown Bag.  I love the texture the sanding gives the embossed mat.  Since it is kraft core, it really adds a lot of visual interest.


In the photo above, you can see a bit of the dimension from the skull and cross bones.  I printed the image on white paper as well as the kraft.  The skull and cross bones was covered with a thin layer of Glossy Accents and fussy cut after it had dried completely.  It was then just paper pieced onto the colored kraft.


I used is a Tim Holtz sentiment stamp that fits Sally's attitude perfectly.
"One of the advantages of being disorderly is that one is constantly making exciting new discoveries."
Love that!!
The quote is actually from A. A. Milne,
most famous for "Winnie the Pooh."

Other supplies used for this card:
Coloring medium: ProMarkers
Paper for card base: Bazzill
Designer Paper: DCWV Tattered Time stack
Charm, gears and clock hands: Michael jewelry dept.
Rustic twine: Etsy

Everyone at Just Inspirational Challenges is excited to see your new creations using kraft paper this week.  Good luck to all that join us!!

Thanks so much for spending some time with me today.
I'd love to read your comments!


Saturday, October 26, 2013

Hiding in My Craft Room with a Critter

It's Saturday so you know what that means....
the time has come for a new challenge at

We were all blown away by the incredible entries in the Color It! challenge last week.  Thanks so much to everyone that joined us and we hope to see you all back with new projects for this week.
We would like to see what you can do with this theme:
Use a Critter
How much fun is that?  There are so many possibilities for this one....Thanksgiving turkeys, Christmas cuddly creatures, a layout with you pooch or kitty....anything with a critter.

This week one lucky winner will receive the Cricut Lite cartridge:
Wildlife


I've decided to use a dragonfly as my critter.
Maybe not too cute but still a critter; and I think they are really kind of magical.


That great silver paper you see is from Paper Temptress.  It's Patricia's Mirrored Reflective Cardstock and I'm crazy about this stuff!  It is so much shinier than it shows in the photos.  Plus, as you can see, it dry embosses like a dream.


For this card, I used my Cricut and the Home Decor cartridge.  The dragonfly was cut at 2 1/2" and glued to the Mirrored cardstock.  After the glue dried, I ran it through my Sizzix Texture Boutique.  I've kept this card A2 sized and very low in profile so it could be sent in with my next shipment of cards for Operation Write Home.  The only embellishments I added were the very small blue brads.

You can find this card in the following challenges:

A Creative Romance -- Add metal
Chocolate, Coffee, and Cards -- Bugs and little critters
Crafty Hands -- Anything goes
4 Krafty Girls -- Anything goes
Delightful Challenges -- Winged things
Southern Girls -- Shine on
Digistamps 4 Joy -- Embossing

What kinds of critters are we going to be finding in this week's challenge?  It should be very interesting!  All of us on the Design Team are excited to see your new creations.

Thanks so much for stopping by today!


Wednesday, October 9, 2013

Stamp 'n Doodle Embossing Challenge

Since today is Wednesday that means we have a new challenge for you at Stamp 'n Doodle.  Thanks so much to all of you who shared with us during our "Boys and Their Toys" challenge last week!

As you can see by the title of my post, this week we would love to see your embossing.  Dry and heat embossing are both welcomed as are any of your new paper crafts.  

I used Lynne's fun image called "Milady."  And I have embossed all of my background papers using a dotted folder.  The sentiment has been heat embossed although it doesn't show very well in the photo.  (Really need to do something about my photography!)

Here's my card:

I colored her using my ProMarkers.  My design is inspired by
Operation Write Home's Sketch #179.  I will be sending this card in my October OWH package.

All of the Design Team at Stamp 'n Doodle hope that you will share your embossed cards, tags, layouts, etc.

Thanks for stopping by today.
Please leave me a comment....I love reading each one!!

Friday, September 20, 2013

Retirement for hubby's very first boss

When hubby and I went to our high school reunion last month (our thirtieth!!) we stopped by the restaurant where he had worked as a dish-washer all through school.  It was strange to be back there.  We walked past the payphones he called me on after each of his shifts.  Remember payphones, anyone?  Cell phones are sooooo much better.

As we were eating brunch, I told our waitress that hubby had worked there 30 years earlier and asked if he could take a quick look in the kitchen before we left.  She was sweet enough to take both of us back there.  It hadn't changed much.  As we were paying, we found out from the hostess that the gentleman who had hired hubby almost 33 years ago had just retired in July.  Today I finally got around to making the retirement card I had promised to do over a month ago.
--Sorry for the delay, Mister.--


The image is one I found on Free Dearie Dolls blog.  If you've never been over there you have got to go check it out!  Oodles of free digis and they are so cute!!  I thought the chef with a bottle of wine would be perfect because the retiree had been the kitchen manager for well over 30 years at the Brown County Inn.

I kept the design very simple just opting to do a center step card for a little non-frilly interest.  (The recipient is not a big bling kinda' guy.)  The embossed card stock behind the chef was done with a Sizzix candy cane stripe folder.  It's the largest in this assortment:


I placed the bit of paper in it diagonally, lining up the bottom edge with one of the stripes on the folder.  Voila.  Straight stripes from a candy cane folder.  I'm sure that's not a new idea but I still feel better clever.  Love to find new uses for my toys tools!

Here are the other items I used in making this card:

Markers: ProMarkers
Papers:  Papertrey Ink and Recollections
Ribbon and brads: my stash

I did also use Glossy Accents on the wine bottle and glasses although it doesn't show in the photos.  In order to do such a small area, I put a drop of Glossy Accents in the middle of the bottle and each of the glasses.  Then I used the tip of a bamboo skewer to drag it around and fill in the areas I wanted to have a shine.  I saw that in a YouTube video once but for the life of me cannot remember whose video it was so I'm unable to give the proper credit.  My apologies to that crafter!

Here's a shot of the card straight on:


You can find this cute little guy in the following challenges:

Tuesday, August 27, 2013

My first swing fold card and Melonheadz

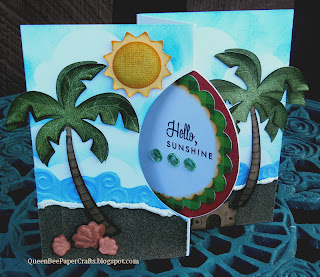
Today I decided to make a swing card.  The couple of video tutorials that I watched both used a Sizzix Big Shot.  I don't have a Big Shot so I needed a work around.  Enter my old school Creative Memories circle cutting system.  If anyone is interested in the how to's of that, let me know and I'll put together a pic tutorial.

The details of this card make me smile.  Here are some the highlights:

*I used sandpaper for the sand on the beach.  (It's 100 grit in case a certain Master Woodworker to my west is reading this.)
*The trunks of the palm trees were hand embossed using a stylus on the reverse side of the paper.  Then they were lightly inked with Tim Holtz walnut stain distress ink.  I started with kraft cardstock so there would be lots of shading.
*The fronds of the palm tree were given veins, again using my stylus.  They were inked using TH forest moss distress ink.  I cut 2 layers for each of the trees so I could layer them.  That cut along with the shells and sandcastle are all from good ol' Create a Critter.
*Also from Create a Critter, I cut one of the clouds and used that as a mask to ink the sky.
*The ocean waves were embossed using the Sizzix Swirls folder in my Textures.  (Probably my most used folder.) I then cut along the swirls to give the appearance of waves.
*Along the top of the sandpaper, I used Marvy's Liquid Applique to give the effect of foam on the beach.  If you're not familiar with Liquid Applique, it's really cool stuff!  A bit like puffy paint except that when you use your heat gun on it, it gets all lumpy and bumpy.  I have grand plans for using it on Christmas cards....lovely piles of snow await.
*The shells and sun were all hand embossed using my stylus to give them some dimension.  

I found the super cute little hula gal at MelonHeadz Illustrating and it was free.  In fact, there are loads of free digis over there and they are fantastic!  Really sweet images!!  Thanks so much to Nikki for so generously sharing.  It's truly appreciated!!

Now, on to the card.


Thursday, August 8, 2013

My Venture into Card Sketch Challenges

Today I'm trying my hand at Sketch Challenges.
This should be interesting because anyone who knows me will tell you that I'm not very good at following directions.
I much prefer to give directions!

Anywho.  Let's see what happens.  I think this is going to turn out to be really fun and should probably help me with some design issues I feel like are sometimes slowing me down.  And I think it's interesting to see how people interpret the sketches.

The first card is for CAS(E) this Sketch.  (Side note: this challenge is now closed.  I got this card submitted just under the wire.)


Next up is my card for Outlawz Wednesday Sketch Challenge.


This card is for the Super Sketchy Challenge at 365 Cards.


And my final card for the sketch challenges today is being submitted at Die Cuttin' Divas.
(How much do I love that name?  A LOT!)


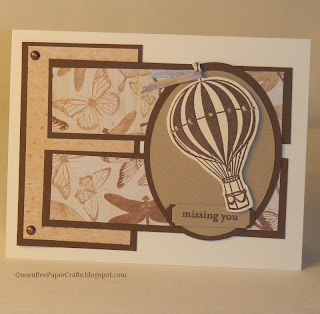
This card can also be seen at 365 Cards in their earth tones challenge.


I had so much fun today working on these cards!  Sketches haven't seen the last of this girl.  If you have any questions about any of the cards or materials used, feel free to contact me.

As always thanks for the time you've spent here at
Queen Bee Paper Crafts!


Sunday, August 4, 2013

Cricut Baby Steps + Peachy Keen = Too stinkin' cute!!

Already in this very young blog, I've stated just how much I love Peachy Keen face stamps.  And I'm gonna' say again...I love those cute little things!  Using those along with a white gel pen, Glossy Accents and a tiny bit of chalk makes me feel like I'm some sort of artist.

Then add in the power duo of Cricut Craft room and their Baby Steps cartridge.  And wow, baby!   (He he he, see what I did there?  Wow, baby....Get it? Baby Steps cartridge. Okay, so sometimes I amuse myself more than those around me.)  Anyway, the possibilities are truly endless.

Here's an example of some fun I had playing with these items.


In Craft Room, I welded together the cloud with the sky background and sized them to be the base of this shaped card at about 6 1/2 x 6 1/2.  I also scaled the cloud to be cut individually and the moon to fit on the base.  All of those items can be found on page 24 of the handbook.  I decided to use the baby from page 22 because I wanted her to be wide awake and ready for a Peachy Keen smile.  In order for the stamp to work properly, I hid all of the contours on the baby girl.  The balloons are from Create a Critter (but loads of cartridges have balloons.) 

I dry embossed the cloud using my Sizzix Textures and the Sizzix "Swirls" folder.  I then lightly inked the cloud with a Recollections light blue chalk ink.  The sky background is from SEI paper and was inked with Colorbox ink.  The stars are made with Liquid Pearls.  I did a little dollop in several spots and then went through each one with a bamboo skewer to make the points.  


Instead of using the flower that's included with the baby cut, I used a tiny flower punch from my stash and cut several layers from the scraps of the cut for her diaper, headband and balloons.  The edges were inked with a pink Recollections marker from the Michael's $ bin.  And it was completed with a purple brad for the eye of the flower.  We R Memory Keepers baker's twine was used for the balloon strings.


Along with the SEI paper, I also used Bazzill and Papertrey Ink papers.  And, SHOCKINGLY, I think I was able to complete this card without the use of a single Tim Holtz product.  I didn't think I could do that!


Thanks for stopping by and I hope that you have a wonderful week!

You can find me at the following challenges with this little sweetie:

Fantabulous Cricut -- Shaped card
Five Simple Things -- Inspire me Fridays
2 Creative Chicks -- Anything goes for kids
365 Cards -- Textured backgrounds
Hobby Cutz -- A card for a child

Related Posts Plugin for WordPress, Blogger...